AI-based Threat Detection - Part 2: Deep Learning (CNN)

For the second installment in the series we will build a Convolutional Neural Network (CNN). We will use the same dataset for training the model, you can get the data here:
This allows us to compare each model's performance as part of our model evaluation.
Important to note, that most models are described (as shown in the above) using:
- Accuracy
- Precision
- Recall
- F1-Score
- ROC-AUC (not shown above)
We must ensure our data-splitting process is the same for each model. So, all training data sources must be the same; along with all evaluation data sources (maybe PCAP).
If you're not familiar with the dataset - it's described in the first article - check it out:

Again, we will need to perform the following steps:
- Script to train and build our AI model.
- Script to run and evaluate our AI model.
What's CNN Deep Learning?
Firstly, let's unpack what Machine Learning allows us to do (in terms of detection):
- Behavioural Analysis;
- Anomaly Detection;
- Pattern Recognition; &
- Threat Classification.
So, we will be looking at the following Machine Learning techniques in this series:
- Supervised Learning;
- Unsupervised Learning;
- Reinforcement Learning;
- Deep Learning; &
- Hybrid Ensembles.
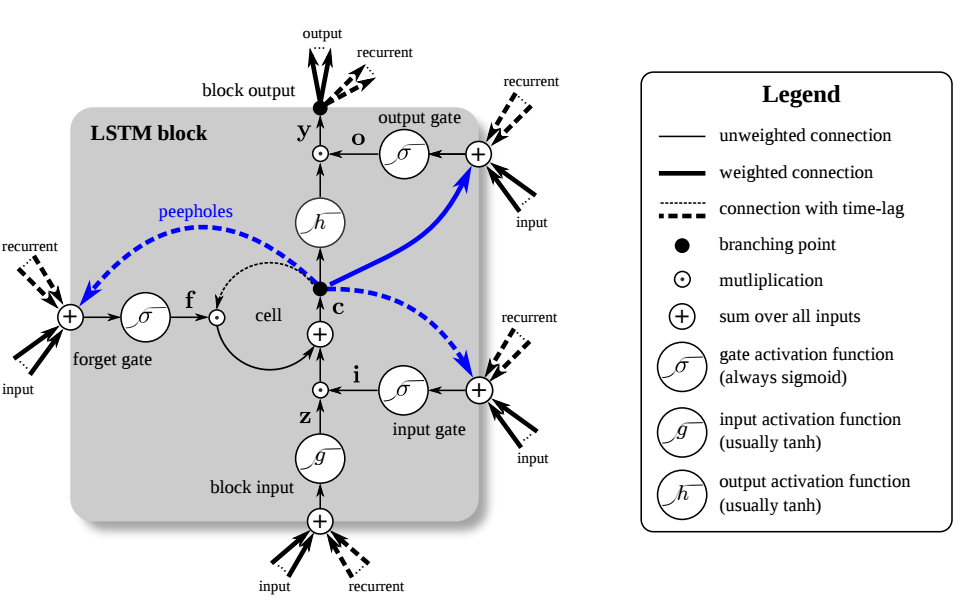
CNN is a Deep Learning (4) approach that we are going to use for threat detection.
CNN will identify the network flow data (netflow) multi-dimensional patterns. Then, we will use Long Short-Term Memory (LSTM) to capture temporal event sequence context.
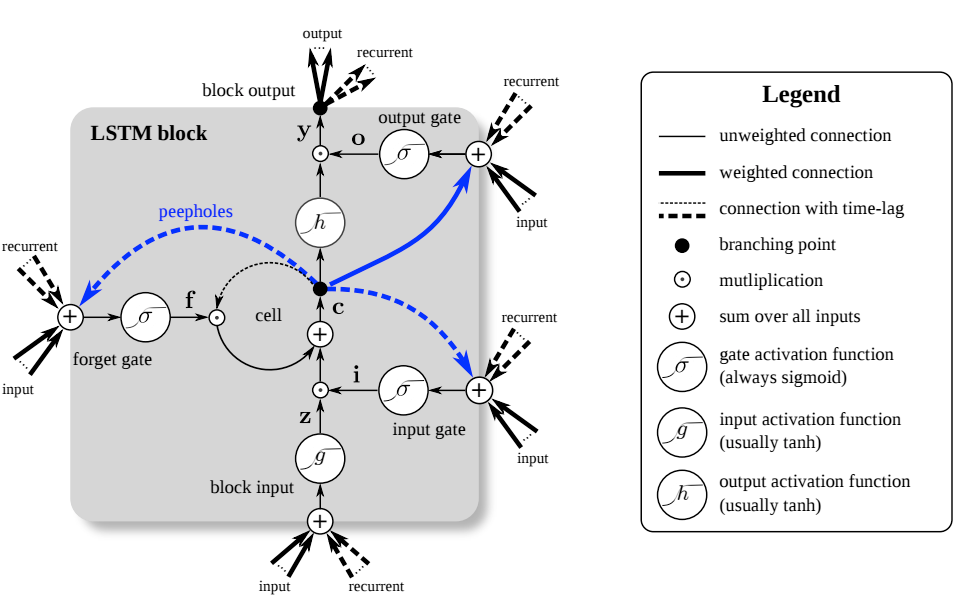
The complete (script) architecture (as described by Claude Code):
- CNN — extracts local feature patterns from netflow feature windows
- LSTM — captures temporal/sequential dependencies across flows
- Attention — weights the most relevant time steps for classification
You can roll your own - or - use my (Claude Code generated) toolset:
I forgot to tell you this the last time!
If you're using my scripts - install all python dependencies:
pip3 install torch numpy pandas scikit-learn scapy joblib
How do I train my own model?
Right, so we can take our script and train (build) the model with our dataset. Here is the script's help output - showing the various input (argument) parameter options:
usage: CNNdetect.py [-h] {train,predict,live} ...

CNN-LSTM-Attention Network Threat Detector

positional arguments:
  {train,predict,live}
    train               Train the model on a labelled netflow CSV
    predict             Classify flows from a CSV file
    live                Capture and classify live traffic

options:
  -h, --help            show this help message and exit

CNN-LSTM-Attention Network Threat Detection Tool
=================================================
Modes:
  train   -- Train the model on a labelled netflow CSV dataset
  predict -- Analyse a CSV file of netflow records
  live    -- Capture live traffic and classify flows in real time

Usage:
  python threat_detector.py train   --data flows.csv --model model.pt
  python threat_detector.py predict --data flows.csv --model model.pt
  python threat_detector.py live    --model model.pt --iface eth0
I built my initial model using the following command (epoch 10 to save time):
python3 CNNdetect.py train --data ./datasets/NF-UNSW-NB15-v3.csv --model CNNmodel.pt --epochs 10
This took much longer than the Bayesian script in the first article. However, you can use the build time to understand the concept of Grid Search Hyperparameter Tuning.

For example, you can tune the Hyperparameters as follows (epoch is 50 by default):
python3 CNNdetect.py train --data ./datasets/NF-UNSW-NB15-v3.csv --model CNNmodel.pt --epochs 50 --seq-len 10
This is an example of the output you should see when training (with epoch 10):
python3 CNNdetect.py train --data ./datasets/NF-UNSW-NB15-v3.csv --model CNNmodel.pt --epochs 10
2026-04-11 14:09:48,084 [INFO] Loading dataset: ./datasets/NF-UNSW-NB15-v3.csv
2026-04-11 14:10:01,502 [INFO] Shape: (2365424, 55) | Columns: 55
2026-04-11 14:10:01,502 [INFO] Label column : Label
<<< A whole lot of stuff from here >>>
2026-04-11 14:10:03,361 [INFO] Classes (2): [np.int64(0), np.int64(1)]
2026-04-11 14:10:05,981 [INFO] Sequences shape: (2242922, 10, 49)
2026-04-11 14:10:06,996 [INFO] Training on: cpu
Then for each epoch you should get this output (epoch is to 10 in this example):
2026-04-11 14:23:36,112 [INFO] Epoch 1/10 | train_loss=0.0088 | val_loss=0.0023 | val_acc=0.9999
2026-04-11 14:23:36,151 [INFO] ✓ Best model saved → CNNmodel.pt
Warning: epoch over and under-fitting
Right, so I used an epoch of 10, which will most certainly cause "under-fitting". This simply means that the model needs to pass through the data a few more times for better performance. On the flip side, too high an epoch number (too many passes) will result in "over-fitting" which will also adversely affect the model's overall performance.
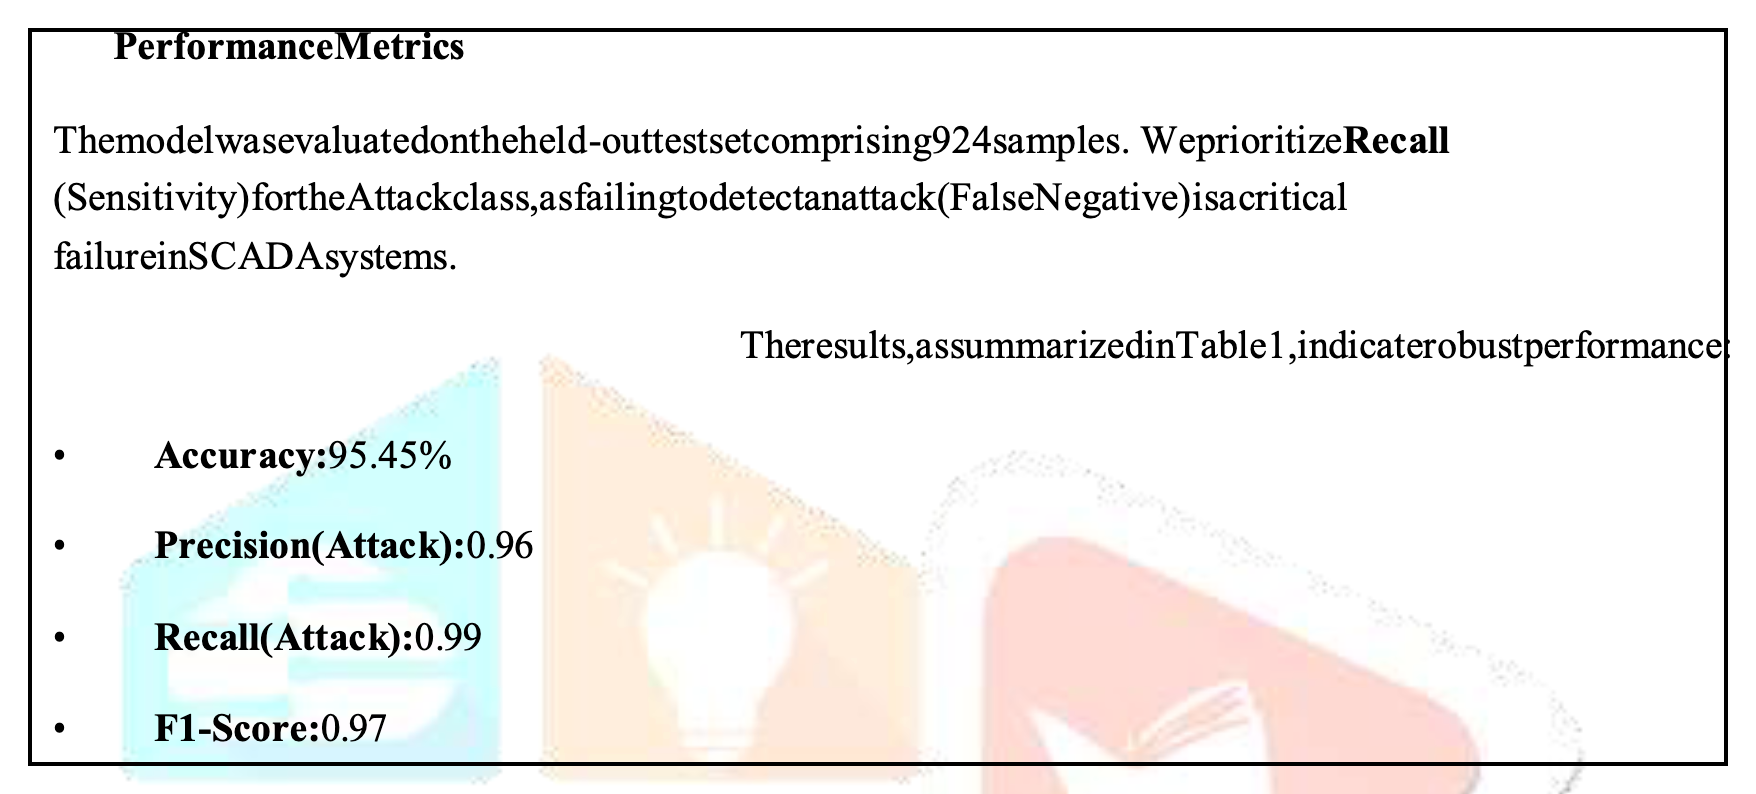
Once its' complete you should see a report:
=== Validation Set Report ===
precision recall f1-score support

      0       1.00      1.00      1.00    430036
      1       1.00      1.00      1.00     18548

accuracy                           1.00    448584
macro avg 1.00 1.00 1.00 448584
weighted avg 1.00 1.00 1.00 448584
How do I run the model?
So, I ran my model using the following command:
sudo python3 CNNdetect.py live --model CNNmodel.pt --iface en0
Ok, so firstly, I used sudo - since network capturing often requires root privileges. Secondly, my interface is en0 (on the Mac), but you should use your own interface.
It looks like this when you run it:
sudo python3 CNNdetect.py live --model CNNmodel.pt --iface en0
Password:
2026-04-11 20:27:50,742 [INFO] Model loaded from CNNmodel.pt → device: cpu
2026-04-11 20:27:50,742 [INFO] Listening on interface: en0
2026-04-11 20:27:50,742 [INFO] Flow timeout: 30s | Batch every: 5s
2026-04-11 20:27:50,742 [INFO] Classes: ['0', '1']
2026-04-11 20:27:50,742 [INFO] Starting capture (Ctrl+C to stop)…
[20:28:25] ⚠️ THREAT | 0 | conf=100.00% | flows=2
[20:28:30] ⚠️ THREAT | 0 | conf=100.00% | flows=3
Super important!!! I'm not sure why, but - CTRL C - didn't break the code running on my Mac. I had to "ps -ax" and then "kill <process no.>" to stop the live script from running.
It doesn't & won't work!
Also worth mentioning that even though it runs - it doesn't work. Not even close - the epoch is too low. The reason we still using it is - to teach you to train your own model.
We will train an improved model using an appropriate epoch for the model evaluation.
Ok, now what?
Go create your own datasets, classifications and models to suit your environment.
Conclusion
I'll write an article on the model performance once used it in a live environment - subscribe to be notified.
As always, if I got anything wrong,...

References
The following websites serve as appropriate references for additional detail: